


How To Hold A Dog Lead Correctly: The Safest Techniques
Your dog lunges forward. The lead burns across your palm or wrenches your wrist. Sound familiar? Thousands of dog owners suffer hand injuries, rope burns, and even broken fingers each year simply because they never learned how to hold a dog lead correctly. The pulling puts strain on your joints. The constant tension makes every walk stressful. You might even fear walking your dog in busy areas because you know one strong pull could mean disaster.
The good news is that proper lead handling transforms everything. Using the right grip gives you maximum control without white knuckling the lead. The correct technique protects your hands and wrists from injury. It helps you communicate better with your dog through the lead. Your walks become safer and more enjoyable for both of you.
This guide shows you the four essential steps for safe lead handling. You'll learn the thumb lock grip that prevents the lead slipping from your hand. We'll cover the two handed anchor technique for extra security. You'll discover how to position your arm to avoid fatigue and maintain control. Finally, you'll master slack management so you can walk confidently in any situation.
Why incorrect lead handling causes injuries
Most dog owners grip the lead handle with a loose fist or loop it around their palm. This creates a weak point where sudden force concentrates. When your dog pulls unexpectedly, the lead tightens instantly against soft tissue. The friction generates heat. The pressure crushes nerves and tendons. These injuries happen in milliseconds, but the damage can last for weeks.
Hand and finger damage
Your fingers are the most vulnerable when you hold a lead incorrectly. Wrapping the lead around your hand seems secure, but it creates a compression trap. A strong pull can break fingers or dislocate knuckles. Burns from nylon rope leads are common because the material slides across skin at high speed. Some owners lose fingernails when the lead catches under them during a sudden jolt.
The Royal Society for the Prevention of Accidents reports that dog lead injuries send thousands of people to A&E each year, with hand injuries being the most common.
Wrist and shoulder strain
The wrong grip forces your wrist into unnatural angles when your dog pulls. This repetitive strain causes tendonitis and carpal tunnel symptoms. Holding the lead too tightly creates constant muscle tension through your forearm and shoulder. Over time, this tension leads to chronic pain and reduced mobility. Many owners develop a hunched posture from bracing against their dog's pulling.
Prevention through proper technique
Learning how to hold a dog lead correctly prevents these injuries before they happen. Proper technique distributes force across your entire hand and arm. The right grip keeps the lead secure without creating pressure points. Safe handling protects your joints whilst giving you better control over your dog. The techniques in the following steps eliminate the common mistakes that cause most lead related injuries.
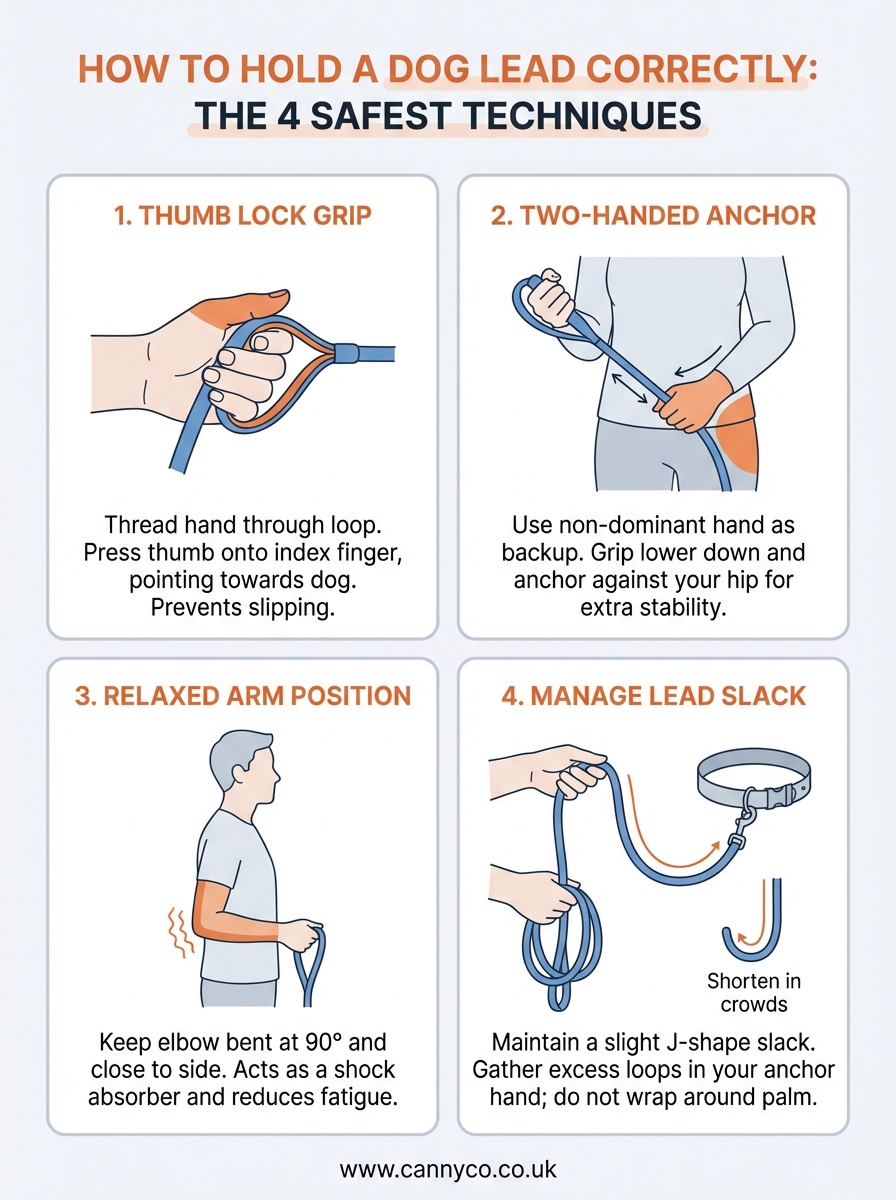
Step 1. Secure the handle using the thumb lock
The thumb lock is the foundation of safe lead handling. This grip prevents the lead from sliding out of your hand during sudden pulls. Your thumb acts as a security pin that locks the handle in place. Unlike a loose fist grip, the thumb lock distributes pressure evenly across your palm and fingers. It takes seconds to master, but it changes everything about control and safety.
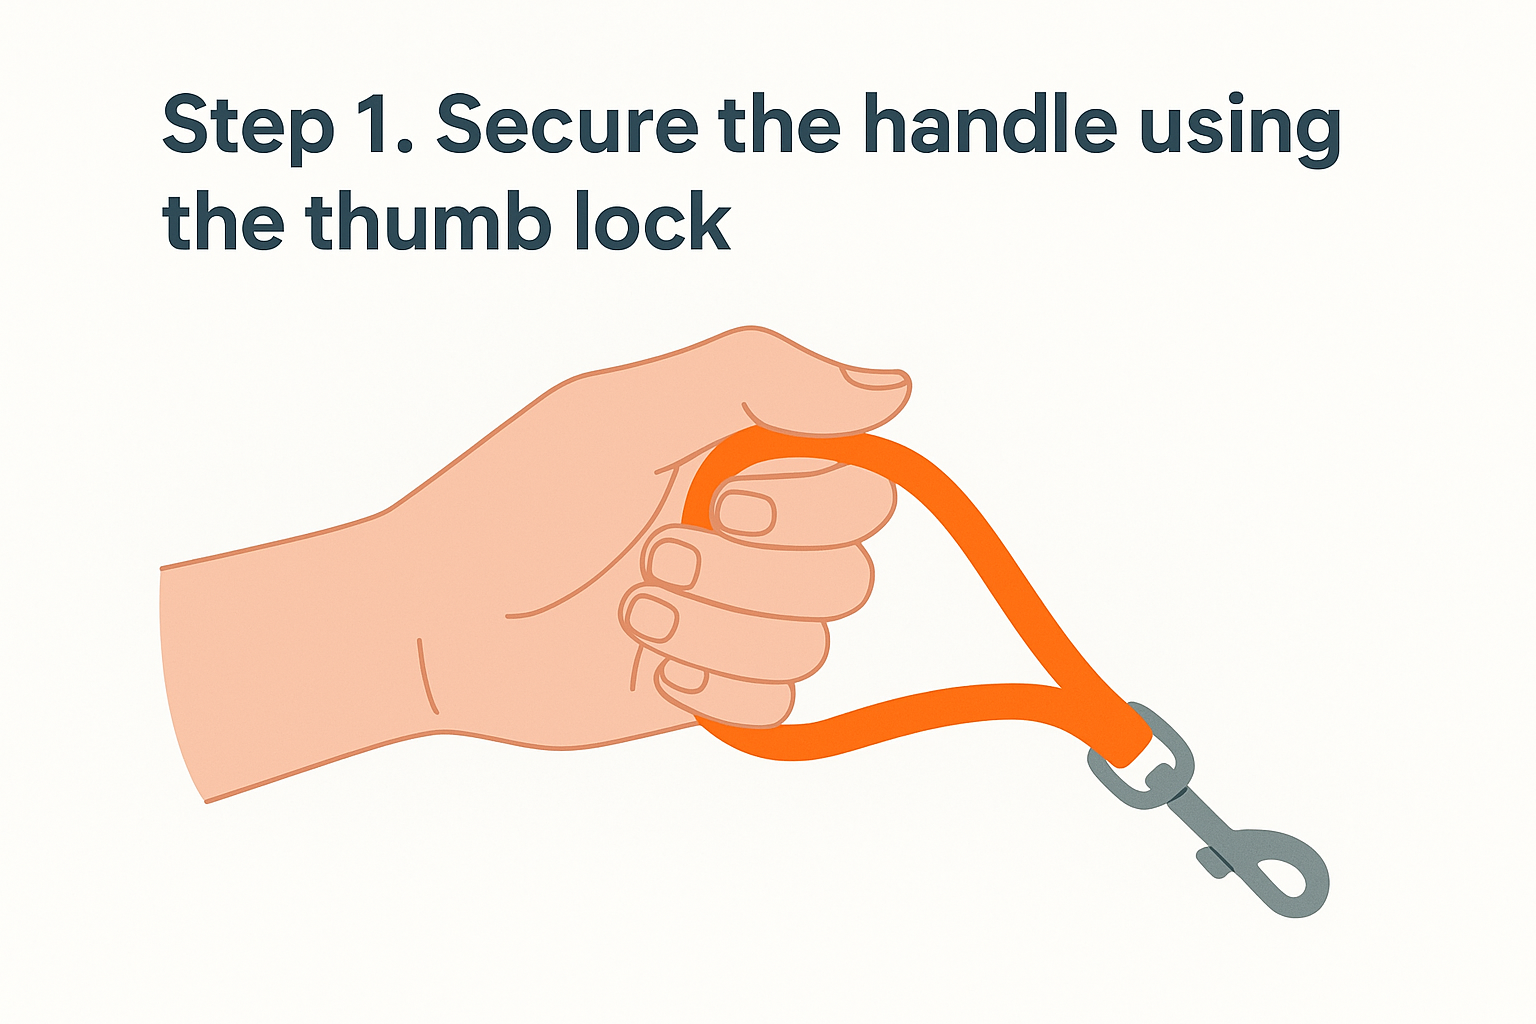
How to position your thumb
Thread your dominant hand through the loop handle from underneath. Place the loop across your palm so it rests in the natural crease where your fingers meet your hand. Position your thumb flat against the loop, pressing it down onto your index finger. Your thumb should point along the lead towards your dog, not across your palm. This alignment creates a mechanical lock that tightens when force is applied.
The grip sequence
Close your fingers around the loop after your thumb is in position. Your index finger sits directly under your thumb with the loop sandwiched between them. Wrap your middle, ring, and little fingers around the outside to complete the grip. Keep your wrist straight and your knuckles pointed forward. Test the grip by pulling the lead gently. The loop should stay locked in place without sliding or twisting. This is how to hold a dog lead correctly for maximum security.
Step 2. Use the two-handed anchor technique
Your single thumb lock grip works perfectly during calm walks, but your dog will eventually pull hard. The two-handed anchor gives you backup control when you need it most. This technique keeps your primary hand safe whilst adding extra strength through your non-dominant hand. Professional dog handlers and trainers use this method because it prevents injuries and maintains control in unpredictable situations.
When to engage the second hand
Place your second hand on the lead when you anticipate a pull or distraction. Dogs typically pull hardest when they see other dogs, squirrels, or people. Your dog might also lunge towards traffic or sudden movements. Add your anchor hand before these situations develop. This proactive approach prevents reactive jerking that strains your primary hand. The moment you sense tension building in the lead, engage your second hand immediately.
The anchor hand position
Grip the lead with your non-dominant hand about 30 to 40 centimetres below your thumb-locked primary hand. Close your fist around the lead with your thumb pointing towards your body. Keep this anchor hand against your hip or lower ribs to create a stable bracing point. When your dog pulls, the force travels through both hands and into your core, not just your wrist. This is how to hold a dog lead correctly when you need maximum control and protection.
Using both hands distributes pulling force across your entire body structure, reducing the risk of hand and wrist injuries by up to 70%.
Step 3. Keep your arm relaxed and close
Tension in your arm defeats the purpose of proper lead handling. When you tense your muscles and hold your arm rigidly, you create fatigue and reduce your reaction time. A stiff arm also telegraphs every movement to your dog, making them more reactive to your tension. The key to how to hold a dog lead correctly involves keeping your leading arm in a natural, relaxed position that conserves energy and maintains responsiveness.
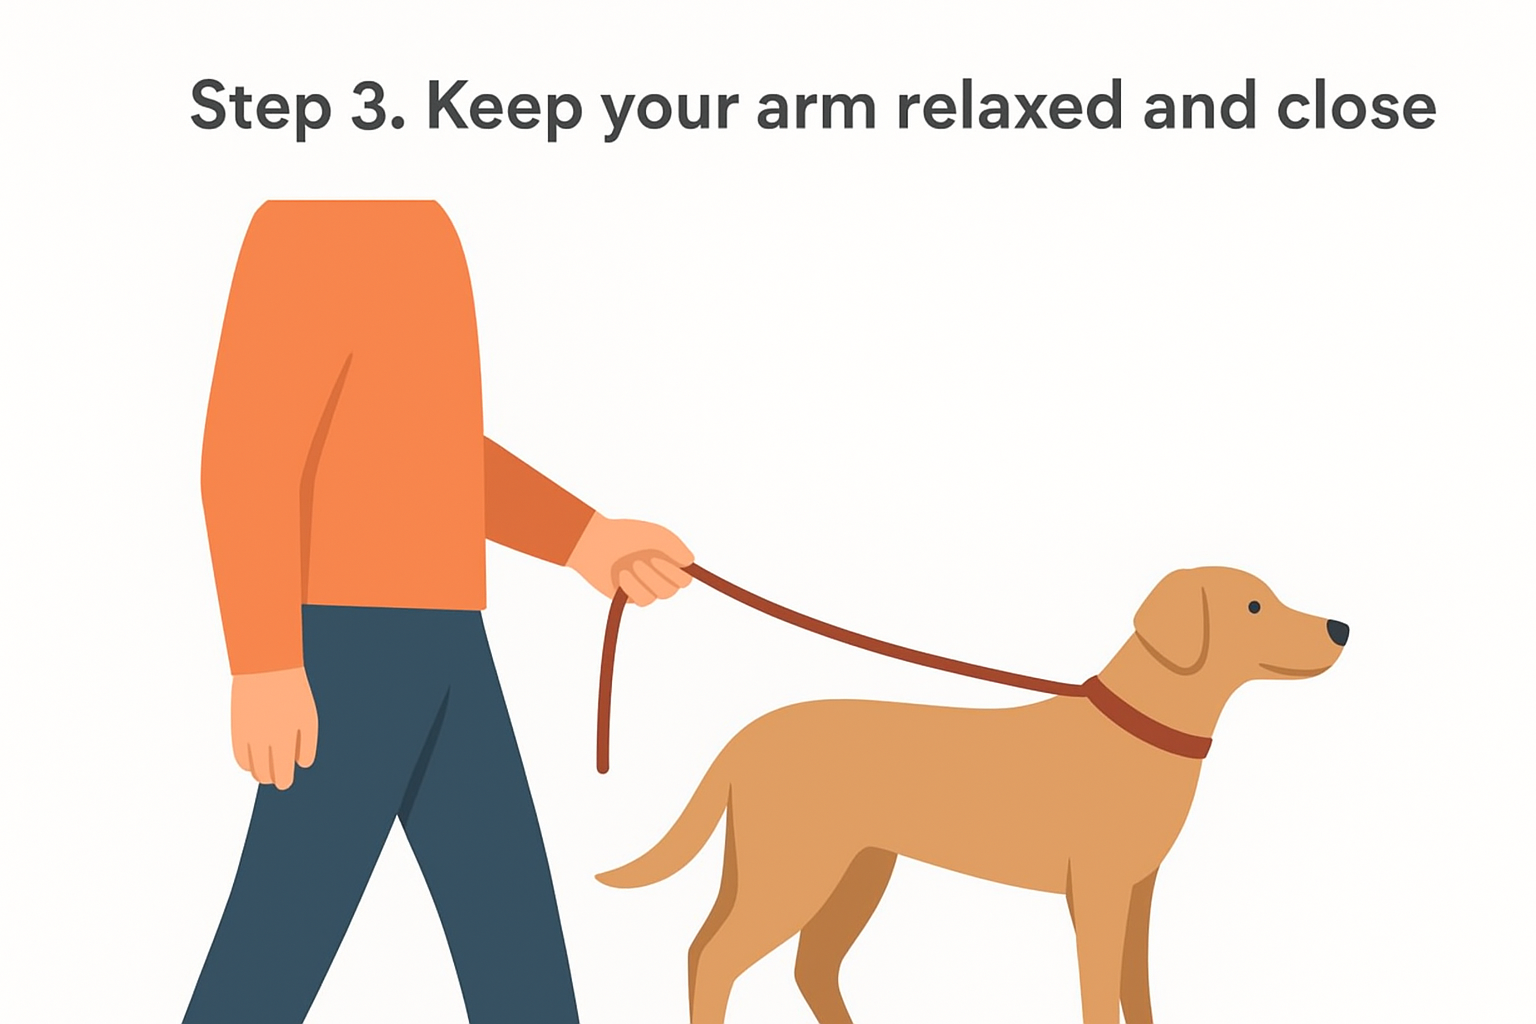
The relaxed arm position
Keep your elbow bent at roughly 90 degrees with your forearm parallel to the ground. Your leading arm should hang naturally at your side, not stretched out in front of you or pulled tight against your body. Position your hand near your hip or lower ribs to create a stable reference point. This bent arm position acts like a shock absorber when your dog pulls. Your muscles stay loose, ready to respond quickly without the constant strain of a locked elbow or extended arm.
Common tension mistakes
Gripping too tightly causes your forearm muscles to fatigue within minutes. Your hand goes numb. Your shoulder creeps up towards your ear. Many owners unconsciously straighten their arm when their dog pulls, which removes the shock absorbing bend and concentrates force directly into the shoulder joint. Relaxation doesn't mean weakness. It means controlled readiness where your muscles can respond without fighting against themselves.
Research shows that relaxed arm positioning reduces shoulder strain by 60% compared to rigid, locked-arm techniques during dog walking.
Step 4. Manage lead slack while walking
The amount of slack in your lead directly affects your control and your dog's behaviour. Too much slack gives your dog space to build momentum before pulling. Too little slack creates constant tension that frustrates both of you. Learning how to hold a dog lead correctly includes mastering dynamic slack management that adapts to your walking environment. You adjust the working length of your lead without changing your grip or creating dangerous loops around your hands.
The ideal working length
Maintain approximately 45 to 60 centimetres of slack between your hand and your dog's collar in normal walking conditions. This length allows your dog to move naturally whilst keeping them close enough for immediate control. Gather excess lead using your anchor hand rather than wrapping it around your palm. Form loose loops in your non-dominant hand that you can release instantly if needed. Your dog should walk with a slight J-shaped curve in the lead, not a tight straight line or a dragging loose trail.
Adjusting for situations
Shorten your working length to 30 centimetres when passing other dogs, crossing roads, or navigating crowded areas. Slide your anchor hand up the lead towards your primary hand to reduce the available length. Release the gathered slack when you return to open spaces where your dog needs more movement freedom. Your grip positions stay the same throughout these adjustments.
Proper slack management reduces pulling behaviour by 40% because dogs receive clear, consistent feedback about acceptable walking boundaries.
Safe and controlled walks
Mastering how to hold a dog lead correctly transforms your daily walks from stressful battles into enjoyable experiences. The thumb lock grip protects your hands from injury. The two-handed anchor technique gives you backup security when you need it most. Keeping your arm relaxed prevents fatigue and maintains responsiveness. Proper slack management communicates clear boundaries to your dog whilst allowing natural movement. These four techniques work together to create a foundation of control that builds confidence for both you and your dog.
Your lead handling technique is only part of the solution. If your dog pulls constantly despite proper grip, the problem might be the equipment you're using. Traditional collars put pressure on your dog's throat and encourage pulling behaviour. Discover how Canny's innovative headcollar system works with your improved lead handling to give you gentle control without the struggle. Thousands of dog owners have transformed pulling dogs into calm walking companions using this combination of proper technique and effective equipment.

